
How to add pop-up lists to any Word document, so you can click your way through changes in seconds
Or how to use the AutoTextList field
Article contributed by Bill Coan
Background
Do you re-use some of your documents over and over again, making slight changes just before you print, fax, or email it each time? Do you, for example, send the same basic letter to each new customer, but edit the letter each time so that it refers to the specific product purchased by that customer?
Starting with Word 97, there's an easy way to add a pop-up list of choices to any Word document. This new feature lets you point at a word or phrase and simply right-click the mouse to switch to some other word or phrase.
For years Word has been able to do something similar with drop-down form fields, but many users chafe at the limitations imposed by form fields. For example, form fields require that documents be protected for forms, which means you have to sacrifice spellchecking, drawing tools, and text formatting. That's quite a penalty to pay, just so you can choose an item from a list!
In Word 97 and above, you can sidestep this penalty by relying on a new feature called the AutoTextList field. Before I show you how easy it is to use this new field, I need to provide some background about AutoText entries and paragraph styles, for users who haven't explored these items.
Important! If you're already familiar with AutoText entries and paragraph styles, or if you're not interested in “looking under the hood,” feel free to skip over these background items and jump right into the procedure that follows.
Background Item #1
AutoText entries are snippets of text and/or graphics that can be added to your
document by choosing the desired entry from the AutoText toolbar. (To display
this toolbar, right-click any other toolbar and choose AutoText.)
Background Item #2
Word's default global template, normal.dot, ships with numerous
AutoText entries but you can create additional entries and store them in
normal.dot or in any other template desired.
Background Item #3
Paragraph styles are collections of paragraph properties that can be
applied to a paragraph by clicking in that paragraph and then choosing the
desired style from the dropdown list of styles on the Formatting toolbar. You
can create new paragraph styles and store them in normal.dot or in any other
template or document desired.
Background Item #4 (the kahuna)
What few users realize is that Word organizes its AutoText entries by
paragraph style. For example, if you click in a paragraph that has been styled
as “Product Name,”
Word's AutoText toolbar will automatically display only those AutoText entries
that have been designated as Product Names (assuming there are any). The
AutoTextList field has this same ability, except that it pops up the list of
Product Names when you point at the field in your document and click the right
mouse button.
OK, the procedure
Ready to create your first pop-up list? Don't be intimidated by the number of steps. Each step involves just one or two mouse clicks and all 13 can be completed in less than five minutes. Besides, you only have to do this procedure once for each list and then you can use each list over and over again as needed.
Before you begin, you may want to print out this procedure to guide you along the way.
Create a pop-up list of products
|
1. |
On the Standard toolbar, click the tool to display paragraph marks if
not already displayed. |
|
2. |
Position the cursor in an empty paragraph. |
|
3. |
From the dropdown list of styles on the Formatting toolbar, choose the Normal style if not already chosen. |
|
4. |
Type your list of products, pressing <Enter> after each product name. |
|
5. |
With your mouse, select the entire list of products. |
|
6. |
Click in the Styles box on the Formatting toolbar, type
ProductStyle and press <Enter>, to create the new style: (Alternatively you can go to Format | Style | New, but that's more long-winded). |
|
7. |
Highlight each individual product name (being very careful not to highlight the paragraph mark after the name) and press Alt+F3 and hit OK. |
|
8. |
Delete the list of products and again choose the Normal paragraph style if not already chosen. |
|
9. |
Press Ctrl+F9 to insert a pair of field braces. { } |
|
10. |
Type the following expression between the field braces exactly as shown: { AutoTextList "product" \s "ProductStyle" \t "Right-click to select product" } |
|
11. |
With the cursor still between the braces, press F9 to update the field (If this fails to hide the field code, press Alt+F9 to hide the code.) |
|
12. |
With your mouse, select the new field, being careful not to select the paragraph mark (¶) that follows the field. |
|
13. |
Press Alt+F3 and hit OK. |
Insert a product list in your document
1. |
Click where you want the list to appear. |
2. |
Start typing “product”; if Word offers to complete the typing for you, press Enter or Tab to accept the autocompletion. If Word doesn't offer to complete the typing for you, select “product” and press F3. |
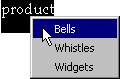
Pop up the product list
1. |
Point at “product” and click the Right mouse button. |
2. |
Choose the desired product. |
How it works
The secret to the AutoTextList field is in the field code, repeated here for ease of reference:
{ AutoTextList "product" \s "ProductStyle" \t "Right-click to select product" }
Here's what each element of the code means:
|
AutoTextList |
This is the field type. This particular type of field creates a pop-up list. |
|
"product" |
This is the field's default value. After the field is created, this value will be replaced when you right-click the field and select a different value. |
|
\s "ProductStyle" |
This tells the field that you want the pop-up list to display only those AutoText entries that were formatted with the ProductStyle. |
|
\t "Right-click to select product" |
This tells the field to display a specific tooltip when the mouse pauses over the field. |
Additional tips for advanced users
|
If you rely on different templates for different types of documents, make sure you're editing a template when you complete the procedure described above. At Step 7 and against Step 13, instead of pressing Alt+F3, choose Insert |AutoText | AutoText.... and then set the LookIn list to your specific template and click Add. |
|
Don't delete the paragraph style created in Step 6. If you do, your AutoTextList field will display all of your AutoText entries, not just the ones of the designated style. |
|
In Step 7, if you include the paragraph mark that follows the product name, the resulting AutoText entry will be inserted into your document with a paragraph mark and the entry will be formatted with the Style created in Step 6. For most users, this is not desirable, but if this is what you want, by all means go ahead and include the paragraph mark. |
|
To make it easier to see the lists embedded in a document, set Field Codes to be shaded Always. To do this, choose Tools|Options|View|FieldCodes|Always. |
|
To navigate from field to field with the keyboard press F11. To navigate backward from field to field, press Shift+F11. |
|
To popup the shortcut menu when the cursor is on an AutoTextList field, press Shift+F10. |
|
If you don't like the "Create Autotext..." command that appears at the bottom of the popup menu, Choose Tools | Customize | Toolbars | Shortcut Menus | Text | AutoTextListField and drag the command from the menu to delete it, then click OK. |